Saturday Jan 2012, It was just me on a friends laptop with no
internet (Subsidy) doing nothing (thanks to ASUU). While playing around I tried
some very awkward things to actually find new things one could do with the
system, and came up with the Ultimate File Hide technique for Windows. (It’s
so easy even my great-grandmother can do it… As in :D)
Let’s call this an Intro
Before I start, most Windows users should be familiar with the normal file hide and how it’s actually done. Windows Gurus should jump to the Main Post (below).
This is how it’s easily done


Let’s call this an Intro
Before I start, most Windows users should be familiar with the normal file hide and how it’s actually done. Windows Gurus should jump to the Main Post (below).
This is how it’s easily done
- First select the File/Folder to hide
- Right-Click to view possible actions, and click Properties
- In the Properties window, under Attributes check the Hidden checkbox to hide or uncheck to unhide


- Then click Apply followed by OK
- While on your Windows Explorer, click the Organize drop down menu
- Go to Folder and search options
- On the View Tab scroll down and you’d see under the “Hidden files and folders” section

- By default the “Don’t show hidden files, folders, or drives” radio button is selected. Select/Check the “Show hidden files, folders and drives”
- also Uncheck
- “Hide empty drives in the Computer folder”
- “Hide extensions for known file types”
- “Hide protected operating system files (Recommended)” *only uncheck this if you like*
- Then click Apply followed by OK
Main Post
Let's assume you’re familiar with File/Folder hiding. We could tweak it extensively to make it impossible for even the best algorithms to resolve "its hidden mysteries". In numbered steps you'd come to know of this easy and secure ultimate technique. (yeah right!)
0 – Rename file to hide skip this risky step (only Savants can pull this one)
Before hiding a file, rename it e.g. If a File/Folder is named “Kalimba.mp3” just rename the file to whatever you could use to remember it e.g.
- abmilak (i.e. if you spell it backwards)
- music (i.e. denotes it’s music)
- cfr0892 (i.e use code/pin format) e.t.c
1 – Change the File extension
The File extension (a.k.a computer file’s identifying letters) is a set of characters following the period/full stop/”.” after the name of a DOS file, identifying the file type. Once you’ve selected the desired file, you are free to change the file extension to whatever you like e.g for my “cfr0892.mp3” I’d just change the file extension to
- "cfr0892.blg” – a Performance Monitor File or
- “cfr0892.pptx” – a Microsoft Office Power Point Presentation
- ”cfr0892.subsidy” – a SUBSIDY File (make sure you download. its FREE)
Note : Only do this for files and not folders. Files come in different formats, luckily window files have the capability of changing formats without losing its content. Now we hide the type of file by changing its format, thereby propagating a change in the Current Default Open Program i.e to appreciate this double click the already changed file, and see what happens.
2 – Zip it
After changing the file extension of the particular file(s), you need to zip the files. Create a new Zip folder and copy files into the zip folder.
- On your Windows Explorer or Desktop
- Simply Right–click and select New and click New Text Document
- A new text document is created with a (.txt) extension, change the .txt to .zip
- and you’d have a Zip folder.
Then copy the file(s)/Folder(s) into the .zip folder
Note : Why zip it? It's obvious that one might not only want to hide a file, we might want to hide files/folders. With the zip folder, it can house other files/folders and has file properties (It's a unique folder that behaves like a file). And with a .zip file/ Zip Folder, Windows Explorer can easily access its contents instead of using Winrars,winzips e.t.c.
3 – Change the Zip Folder’s name and extension
Yes! Change the zip folder’s name and extension to very common/popular Windows Associated System File types e.g “Step2.zip” uhhm let’s change it to “fg.ini” or “autorun.inf” or “access.bat” or "subsidy.msi" and voila Windows automatically assigns the current default program icon to that type. Here we’ve furtively converted a folder back to a file.
4 – Invoke Hidden Attributes and modify Access Control
Set the Property of the file to Hidden, then switch to the Security Tab to modify Access Control. The Security tab is divided into 2 parts, Group or usernames and Permissions.
- Click the Advanced button and a dialog opens showing different names and Permissions.


Click Change Permissions and another similar dialog opens with Add, Edit and Remove.
- Deselect / Uncheck “Include inheritable permissions from this object’s parent” because if it inherits from its object parent it would propagate values to this object which would override our desired access to the file.
- Click Remove.

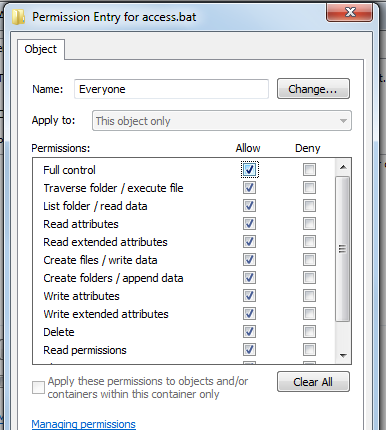
- Click Add and type EVERYONE, then OK.
- Check/Select Deny under Full Control, and it will automatically check all others for you. Click Ok.
- Click Apply, Yes, Ok, Ok, Ok, O_o


Note: Of what use is a hidden file if anyone can access it or even permanently delete it?, That’s why we’ve changed the access control to deny any possible access/control to the file from anybody even if it's the administrators, users, system, groups e.t.c .
5. Lets Test
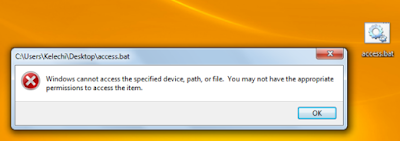
It's time to put our deceptive file to test. Try to manipulate the file, edit, rename, copy, paste, delete, open e.t.c and what you'd receive is just error messages.
Also ask someone else to find your well secured hidden files. (Even the best searching algorithms can’t find it). The truth is that no matter how hard you try the only way to recover/ unhide your file(s)/Folder(s) is just by reversing all the steps taken.
- Remove the Hidden Attribute and Modify Access Control by editing Object Permission.
- Switch to the Security Tab to modify Access Control.
- Click the Advanced Button and a dialog opens showing you different names and Permissions.
- click Change Permissions and another similar dialog opens with Add, Edit and Remove.
- Select EVERYONE and click Edit
- Check Allow under Full Control, and it will automatically check all others for you.
- Click Apply, Yes, Ok.
- Rename file extension to .zip e.g "access.bat" to “Step2.zip”
- Open the .Zip folder and rename all file(s)/folders(s) back to their original extensions & names and their
The Ultimate File Hide for Windows simply because the technique is a simple puzzle (that can only be solved by the initiator) and I think it works on any Windows (from Xp to 7) . We've sure learned something new today so don't forget to try it out ;-).


